Showing posts with label tutorial. Show all posts

Tuesday, May 31, 2016

#lendinglibrarylove: Helping You Find Your Perfect Buckle Carrier

Babywearing International is running a quarterly chapter challenge encouraging all chapters to show their #lendinglibrarylove. Join BWI of Cleveland for a series of blog posts on why we love lending libraries!


"Carriers are like Jeans" infographic courtesy BWI of Hampton Roads 


If you’ve stumbled your way into the wonderful world of babywearing, you may have asked the question “But what’s the BEST soft structured carrier?” or “How can I tell the difference between an Ergo and a Tula and which will work for me?” In our FB group, you’ve probably had a few educators chime in to suggest coming to a monthly meeting and explain that buckle carriers, also known as soft structured carriers, fit different body types very differently and that “like blue jeans, the brand that your best friend loves may not be the perfect brand for you.” We LOVE lending libraries, because they give people a chance to try on lots of different kinds of buckle carriers and make sure they work in real world settings.


You may wonder why buckle carriers get singled out for being such a personal preference. Buckle carrier structure can be broken down into a few different categories: shoulder strap style, waistband style, panel size, panel material and fit. Finding your perfect buckle carrier is all about which variation works for you and your wearee. Even if the exact carrier you’re looking for can’t be tried on in person, you can figure out which features feel most comfortable on you and get help figuring out a brand that combines those features. Let me show you some of the options available in our lending library!


Shoulder Straps
Shoulder straps one of the biggest factors in terms of finding a perfect SSC fit for you. They also determine what kinds of carries can be done with the carrier. Straps fall into 2 categories: curved and straight.
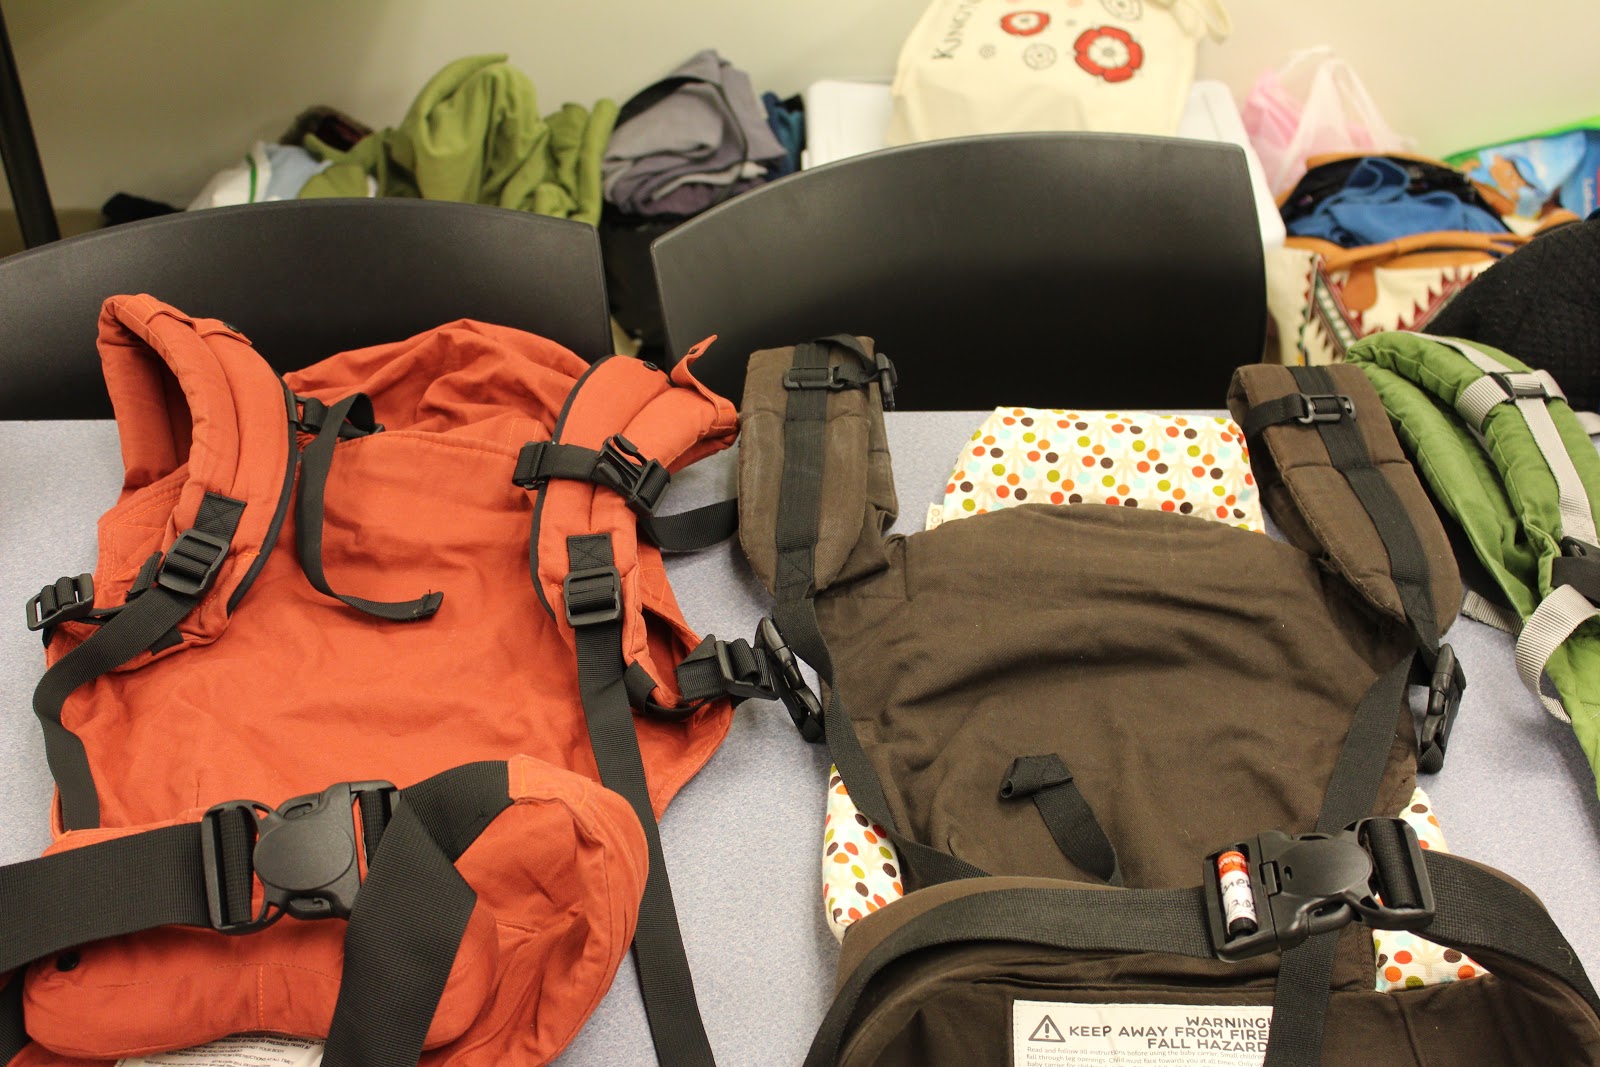

Left: Boba 4G with curved straps Right: Beco Soleil with straight straps


Straps with buckles on the side have the ability to be crossed in the back, which some wearers find more comfortable, and the ability to be worn as a hip carry. For many wearers, the combination of buckles that are closer to the panel, rather than at the end of the padded part of the strap, and straight straps make for the most comfortable hip carries.


Left to Right: Beco Soleil buckles attached at panel; Ergo Original buckles attached to end of strap padding; Lenny Lamb Ergonomic Carrier buckles dual adjusting


Strap thickness also varies a lot by brand. Some people prefer thick, cushy straps with lots of padding, while others prefer thinner padding that is more compact for packing and molds more to the wearer’s shoulders.
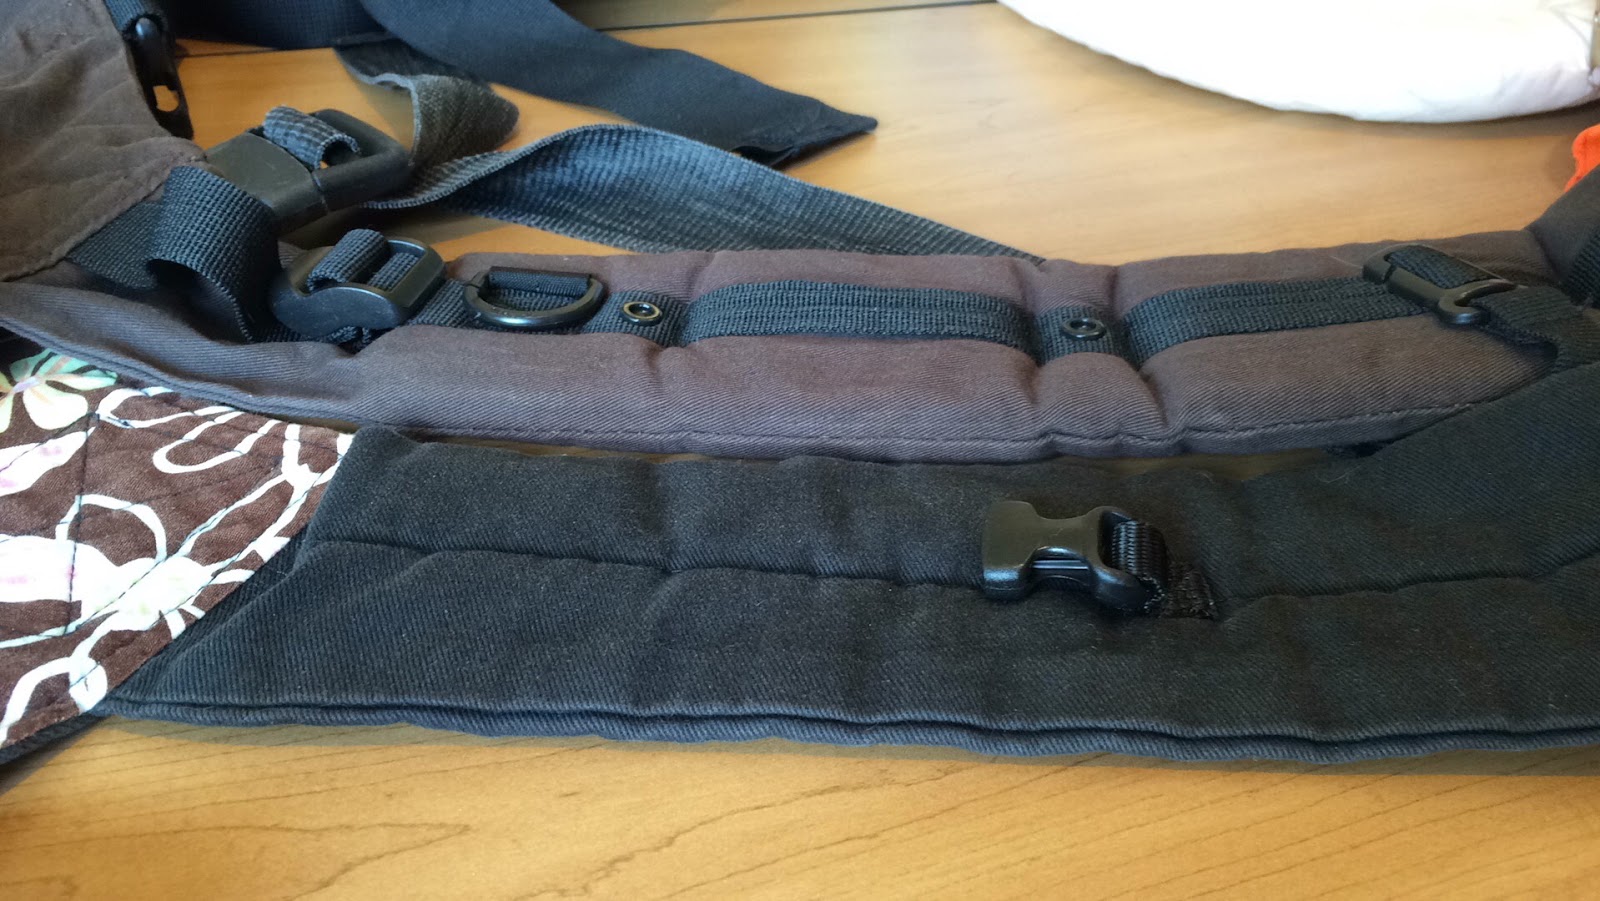

Top: Beco Soleil shoulder padding Bottom: Connecta shoulder padding

Straps can also have perfect fit adjusters (PFAs) which allow the wearer to tighten the space between the straps and the panel. Some wearers also like PFAs for their ability to quickly lower a child to breast height to nurse.
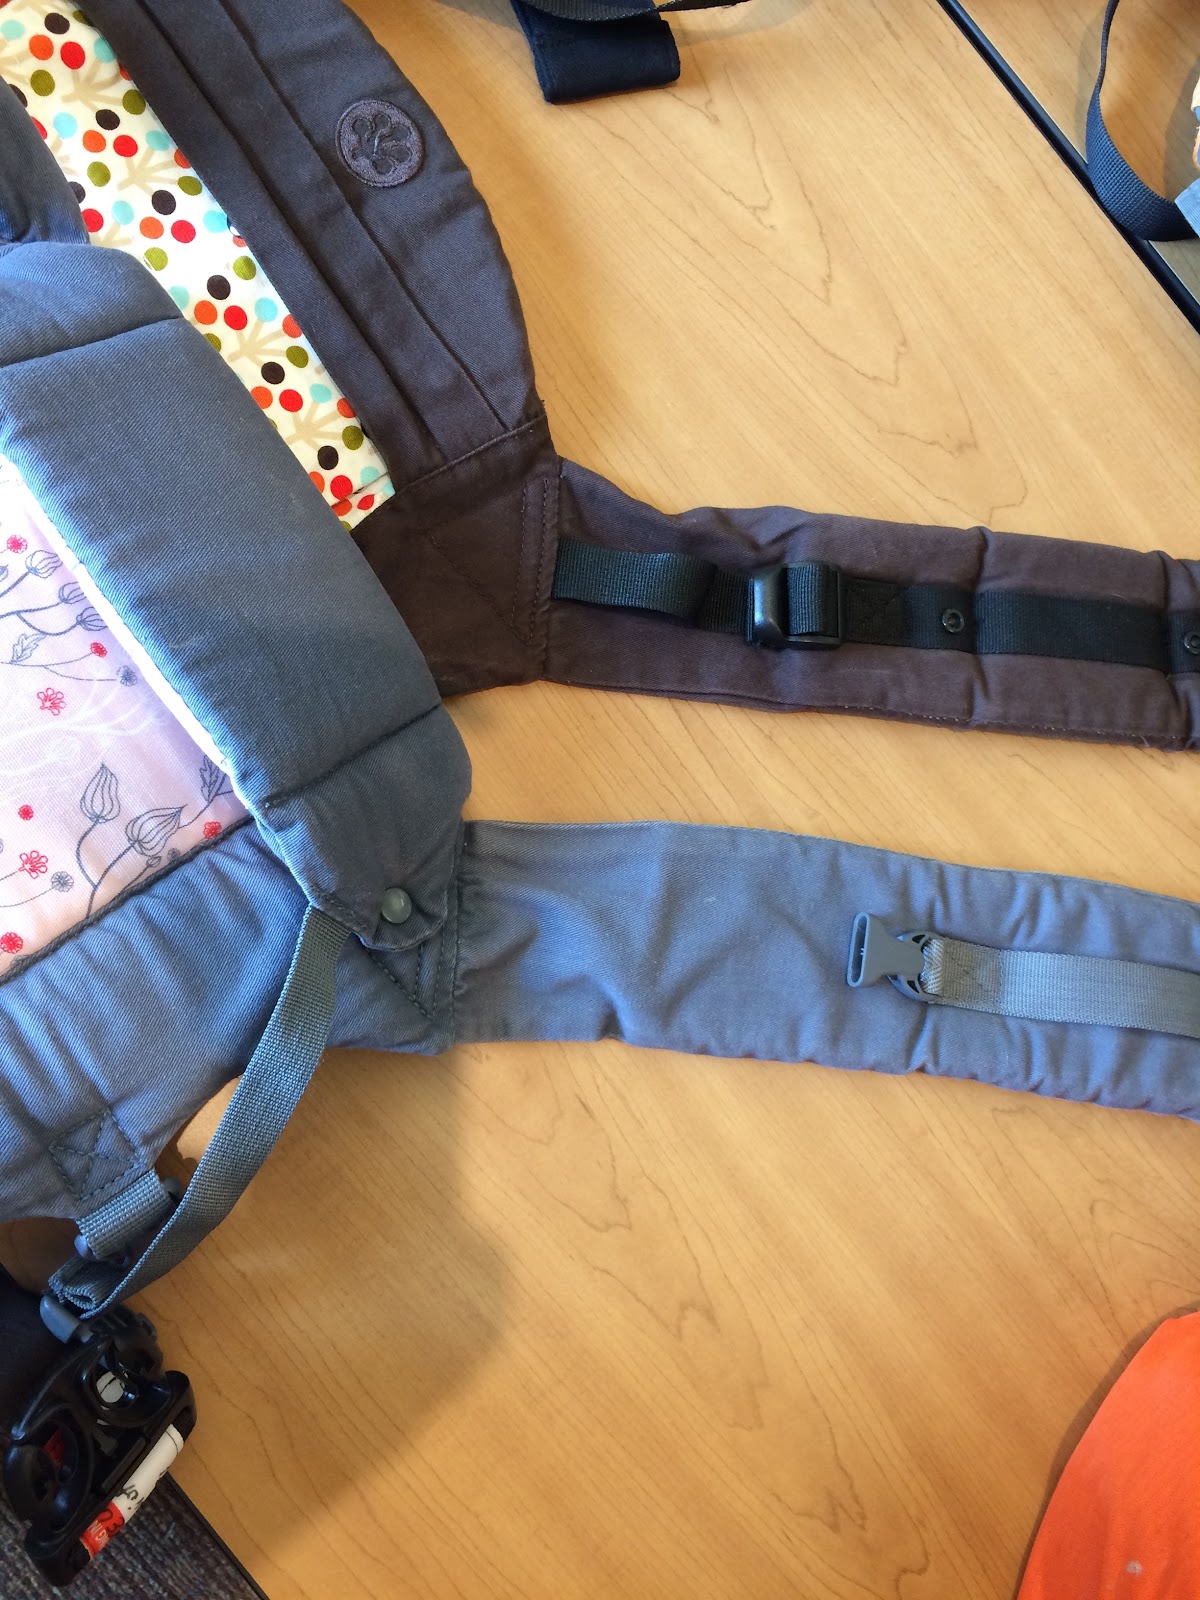

Top: Beco Soleil with PFAs Bottom: Beco Gemini without PFAs


Waistbands
Different buckle carriers also have very different waistbands. They can range from thickly padded to lightly padded to no padding at all. Waistband buckle placement can also vary, from sunk into the waistband and adjustable on one side (single-adjust) to centered and adjustable on both sides (dual-adjust).

Left: Lenny Lamb Ergonomic with lightly padded waistband and dual-adjust buckle Right: Ergo Original with thickly padded waist band and single-adjust buckle


Carriers with no padding in the waistband and unstructured waists are often preferred by those who like to do a high back carry. They can also usually be scrunched similar to a mei tai to fit a smaller child and do not require an infant insert. This is unsafe in carriers with padded waists, because it puts stress on the stitching connecting the panel to the waistband.


Left: Standard Connecta waistband Right: Standard Connecta waistband scrunched and flipped to fit a demo doll


Panel Size
Panel size is also crucial when selecting a soft structured carrier. Panels that are too tall for the child can be a suffocation risk. Panels that are too wide for the child overextend their legs in an unsafe manner. Because buckle carriers are less able to be adjusted to the child’s size in order to provide appropriate airway support, compared to, for example, a wrap or ring sling, an infant insert may be necessary when using a buckle carrier for a child who is unable to support their own airway yet or is too small for the panel.
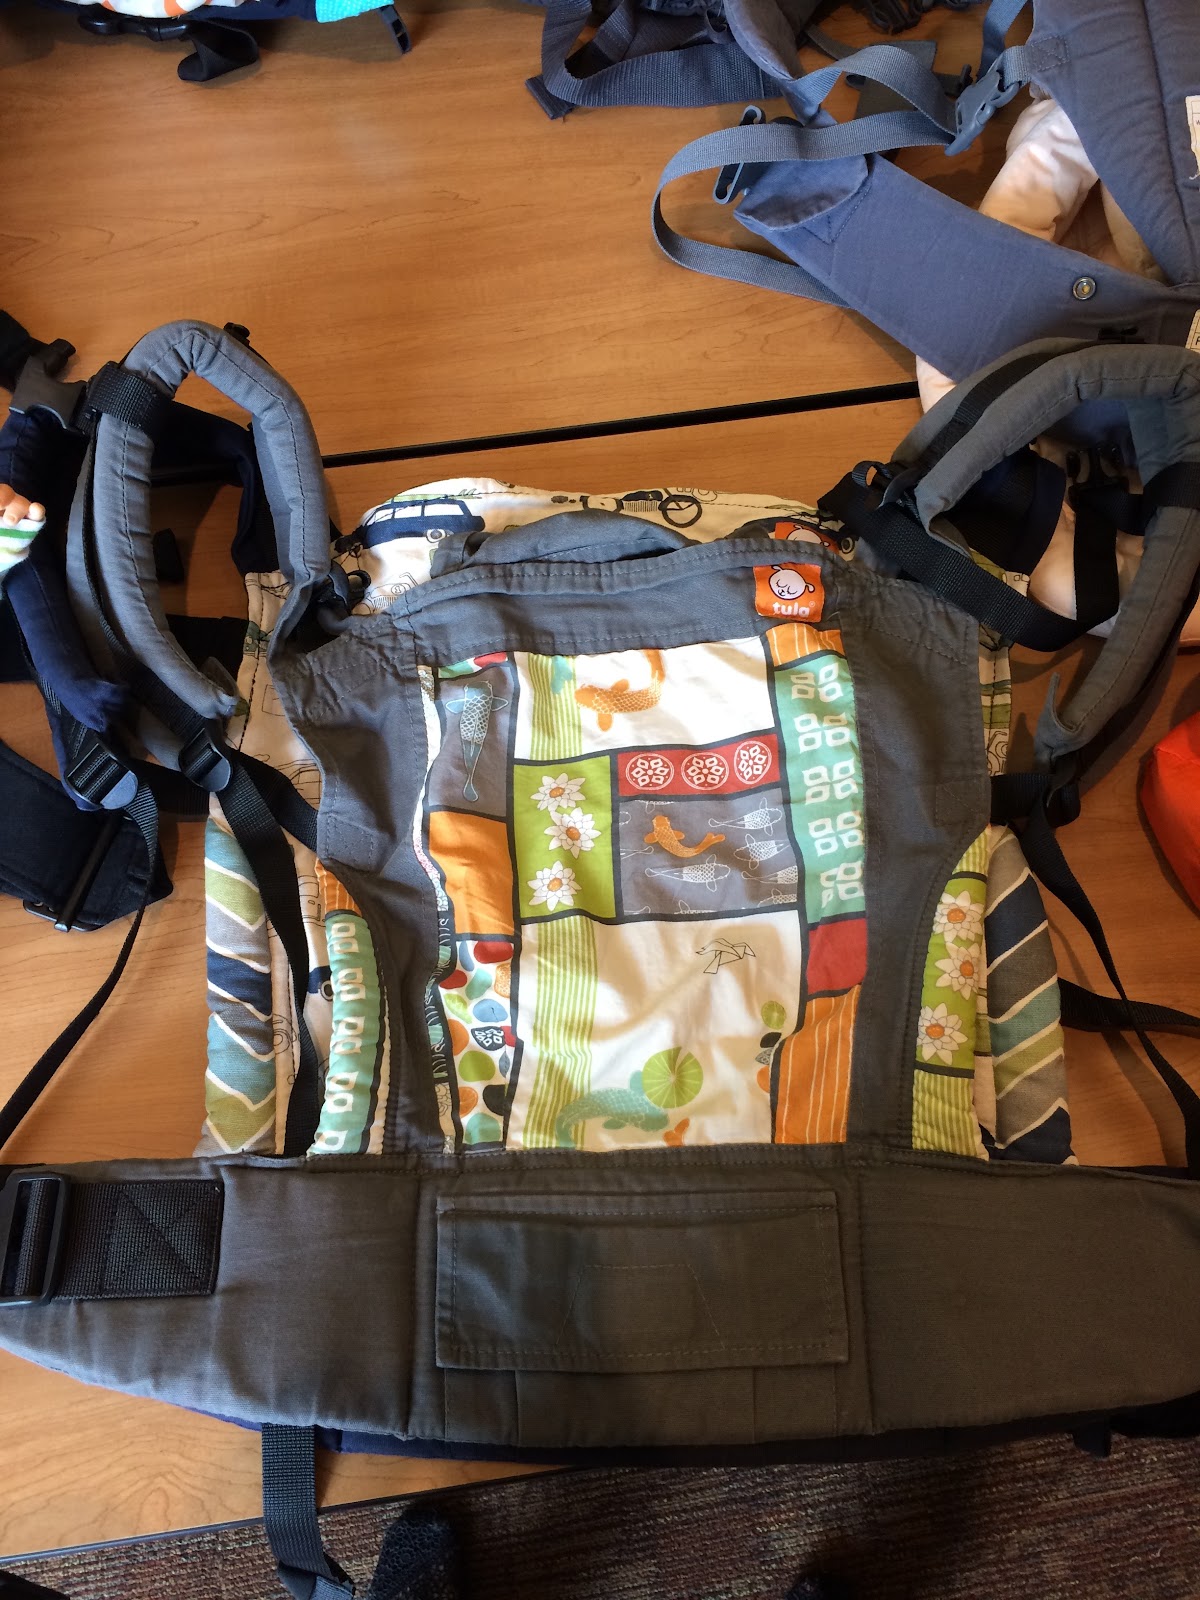

Standard Tula laying on top of a Toddler Tula


Different brands handle the issue of panel size in different ways. Some brands offer different sizes of carriers that fit different sizes of children. Others offer infant inserts that provide additional support for newborns and young infants. Others offer different methods to adjust the size of the panel.


Left: Beco Gemini adjusted with wider base for older child Right: Beco Gemini adjusted with smaller base for younger child and forward facing out


Left: Standard Tula with Tula Infant Insert Right: Standard Tula without Infant Insert


Some panel sizes are also adjustable so that children can be worn facing out once they have solid head and neck control. Buckle carriers without a structured waist can be worn facing out similar to a mei tai.


Beco Gemini adjusted for to face out


Here are some additional resources for the importance of using buckle carriers that fit the child:
To Size Up or Not to Size Up from Beltway Babywearers
Toddlerwearing from Babywearing International of Austin
Kinderpack Sizing from Babywearing International of North Central Illinois
Toddler Carrier Comparison from Dirty Diaper Laundry
Toddler Tula Comparison from Biddle and Bop


Panel Material
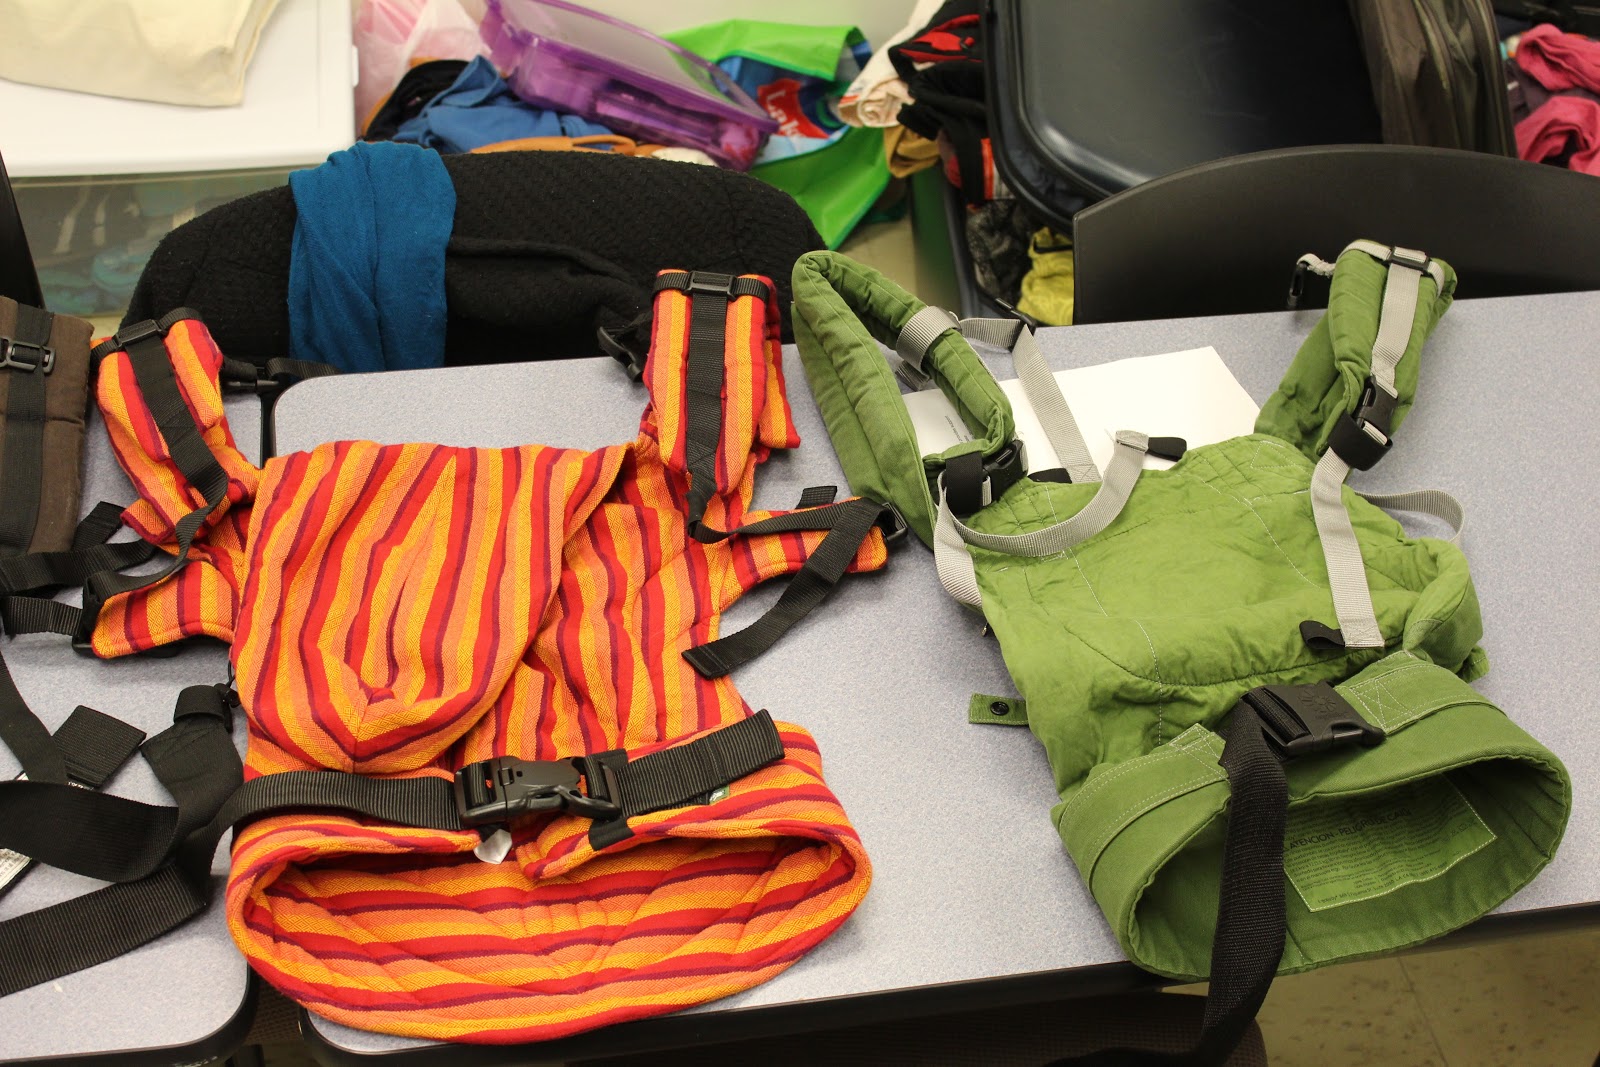
A final consideration in terms of carrier structure is panel material. Some buckle carriers are made out of canvas, while others use woven wraps. Some brands have a panel made out of a relatively thin layer of canvas. Others use padding in the panel. Some brands offer an option with mesh sections to improve airflow. For those living in a hot climate and wearing outdoors, selecting a carrier made from thinner material or with materials to promote airflow can help keep you cool while strapping a tiny heater to your body. Still others are made out of material that can get wet and be worn in water (always on your front!).
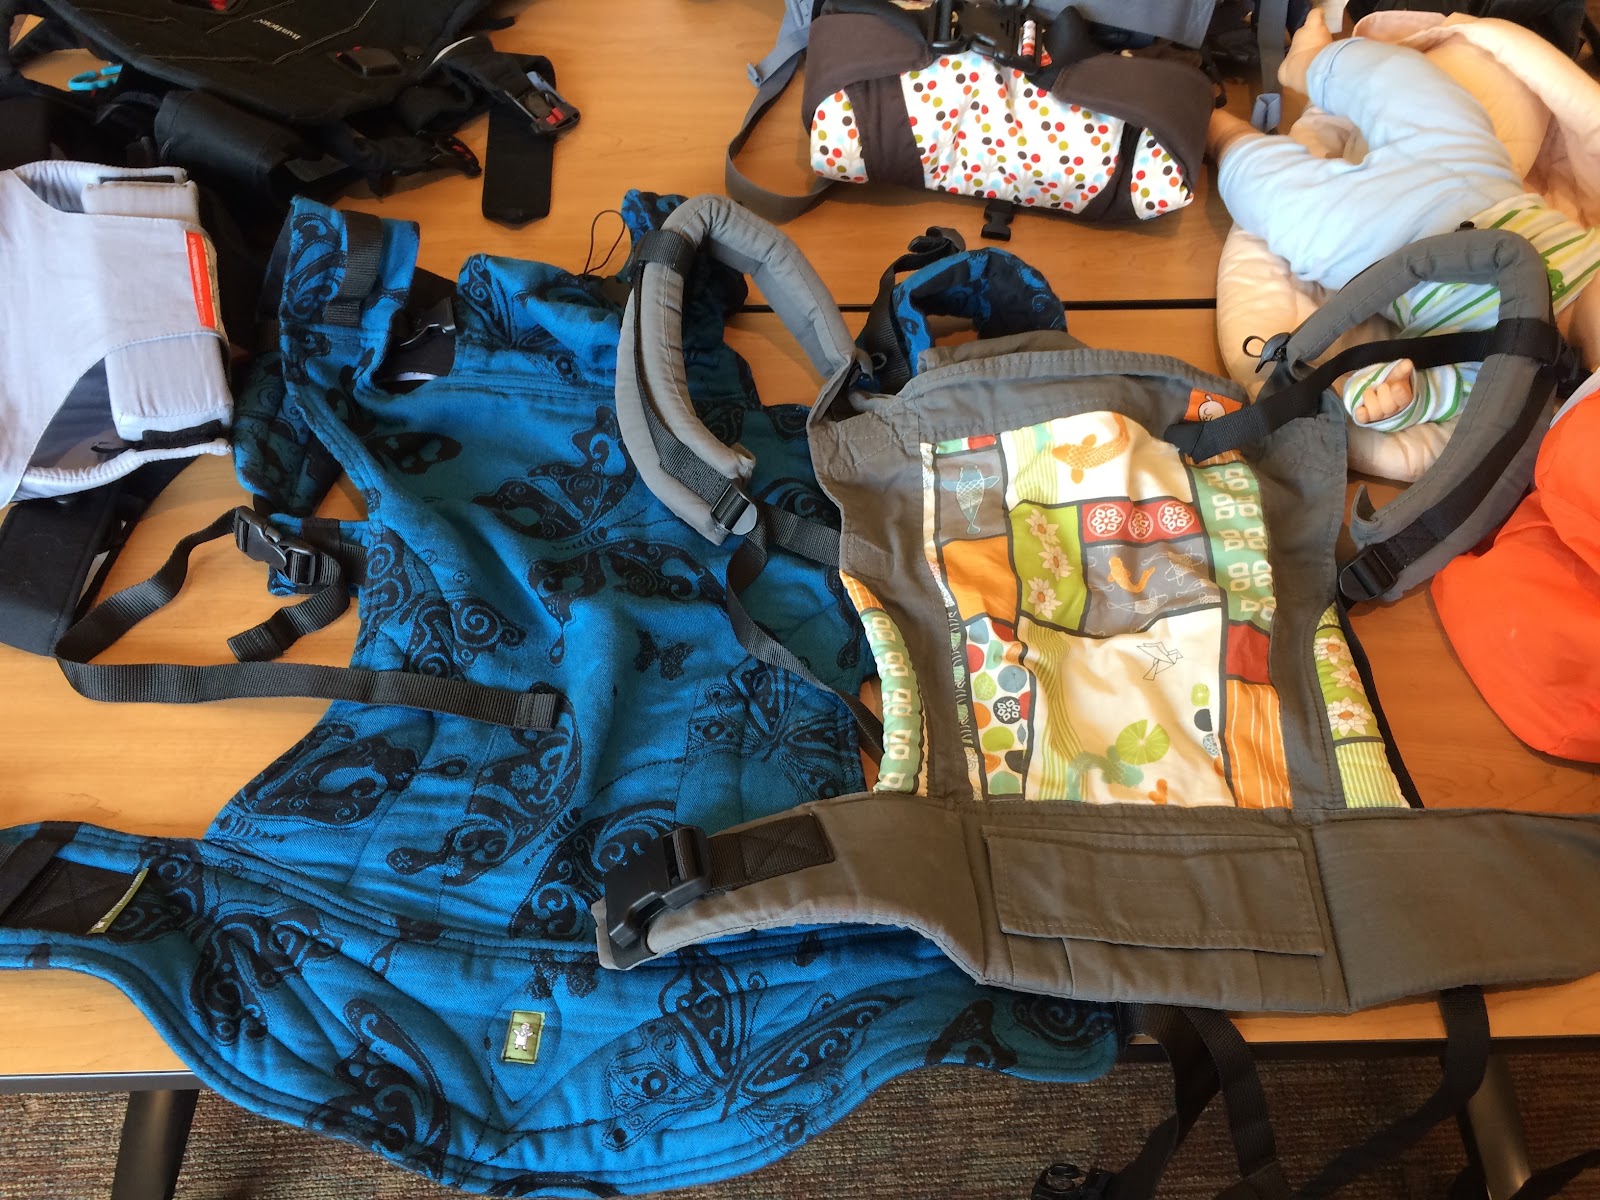

Left: Lenny Lamb Ergonomic Carrier made from a woven wrap Right: Tula made from canvas


Fit
Sometimes finding a buckle carrier is less a matter of finding the perfect brand for you and more a matter of getting the perfect fit. This is where your fabulous neighborhood babywearing educators can provide you with lots of assistance.


Top: Front Carry Positioning Bottom: Back Carry Positioning


Also relevant to fit is the importance of selecting a carrier with an appropriate weight limit. Panel size is usually the most important factor for determining whether a child on the lower end of the carrier’s range is able to use it, but weight limits are often the most important factor for determining when a child is growing out of a carrier, unless you or your child is uncomfortable with the height or width of the panel. Lending libraries can be an amazing resource for testing out whether your child is ready to change carrier sizes.


Our Favorite Buckles!
As you can see here, our educator team has a wide variety of favorite buckle carriers. Feel free to share a photo of yours in the comments below!


Photo: Collage of favorite buckles


Want to learn more about buckle carriers? Check out our Pinterest or come to one of our monthly meetings! Want to see everything in our lending library? Check out our current inventory.


Curious about which buckle carriers have which features? Check out this amazing spreadsheet from BWI of Colorado Springs.


Written by Sarah Miller-Fellows, BWI of Cleveland's VP of Outreach, an Advanced Babywearing Educator and is also a BWI National Research Committee member. Sarah is happily married to Spenser Miller-Fellows and together they have an adorable son, Oliver.

Friday, April 8, 2016

Seeing the World: Everything You Want to Know About Forward Facing Out!


Like so many first time parents, I spent a lot of my pregnancy researching and preparing for this new adventure in our lives. I knew even before I got pregnant that I wanted to include babywearing; a friend had worn her babies and it just made so much sense to me. When Graham arrived, he was all about being held of course, but was less into being worn. He really wanted to see the world, and got very angry when he couldn’t see. In desperation one day when he was around 2 or 3 months, I dug out the Bjorn Original we had received as a gift. Since he had good head control we gave it a shot, and he was SO happy to see what was going on.

I wanted to learn to wrap, though Graham had zero tolerance for front wrap cross carry or any other front wrapping. I was not skilled or brave enough to try back wrapping yet, and he let me know hip carries were also not ok. I tried all of the typical things – give him time to adapt, walk around, etc., but he just got more and more angry when I wore facing in. So, I learned how to wrap him facing forward, in a modified Robin’s hip carry. He was happy, and I could learn some wrapping skills.

I had read that forward facing was “bad” for my baby, but my experience showed me otherwise. And really, despite what you may have heard or read, forward facing is perfectly fine as long as you are safe about it – more on this later. We faced some discouragement, mainly in online forums – I had the lists of why forward facing is bad for your baby linked for me many times. I was careful – it was never for extended periods of time, I trusted my mama instincts to know if he needed a break, and in general we were wearing in fairly calm environments. Mostly we wore around the house, and on our daily walks with our dogs in the woods. I educated myself as best as possible, and want to share what I learned.


So what did I learn? Well, as always with a kid, first and foremost is their safety and comfort. The most important thing to keep in mind when forward facing is protecting baby’s airway. Good head control is key, and the babies I’ve come across that prefer forward facing tend to make that preference known pretty young, so it can get a little frustrating waiting for them to be strong enough. A good milestone to use as a gauge is for baby to be able to push up during tummy time and look side to side. If they can do that without falling, they can hold their head up well enough to forward face. Usually baby will be pretty involved with watching what’s going on, but if they do get sleepy, you definitely need to turn them to face inward. We all get relaxed when we fall asleep, and it’s very likely baby’s head will flop forward – clearly a bad position for breathing well. So, turn them around when they’re still awake so they can rest against your chest.

Overstimulation is often cited as a concern for forward facing. Too much stimulation is very stressful for a baby, especially when they are young. For me though, Graham made it as clear as he could that he wanted to see what was going on. I didn’t take him anywhere incredibly busy, mostly just at home or walking the dogs. He was still close to me, closer than he would have been in a stroller. While I haven’t been able to find research on forward facing babywearing, there has been research into babies interacting with other people, as well as using forward facing strollers. It has been shown to be best for babies to be facing their caregivers as much as possible. I kept this in mind, and we never wore forward facing for more than about 30 minutes. Most will recommend 10-15 minutes. We also spent a lot of time interacting in other parts of life, and he’s always been very social. It is important to keep in mind though that your baby can not see you and read your cues as well when they are facing away from you, so you need to be extra aware of them and check in constantly to know how they are doing.


Comfort is a factor for you both, as in any babywearing. Narrow based carriers have unfortunately developed a bad reputation, but if your baby has healthy hips they are completely safe. I don’t know that I would want to sit that way personally, but I did use one with Graham and he didn’t seem to mind. After all, babies are pretty good at letting you know if they aren’t comfortable. If your baby does have hip dysplasia or other joint or muscle tone issues, you should definitely talk to your doctor or physical therapist about the best way to wear your baby. Otherwise, you can use many different types of carriers to face forward - just be sure that the carriers are meant to do so safely.

So, which carrier is best? Just like any babywearing, the best carrier is what works for you and your baby. Factors include cost, convenience, comfort, and learning curve. I’ll cover all of these for a variety of carriers below. If your baby wants to face forward, and you want to wear them, there is a way to do it!

Wraps: 
You can forward face in both a stretchy wrap and a woven wrap, and there are a few ways to use a woven wrap too depending on what size you have.

Stretchy wraps like Moby, Boba, or other stretchy wraps are commonly used for newborns. They are pretty affordable, often found used for $10-$30, or new for around $40-50. They do tend to get less comfortable for the wearer when baby gets to be around 15lbs, since they do stretch. In terms of convenience, they can take a bit of time to learn to use well, but can be pre-tied (for either inward or forward facing) and you can take baby in and out throughout the day. Facing baby forward can be done with the same pre-tie as facing inwards, the Pocket Wrap Cross Carry (PWCC). Here’s a video of how to face forward with a stretchy wrap:

Forward facing in a Stretchy Wrap. 


Woven wraps can be used a couple different ways to forward face. Their cost is widely variable, depending on brand, fibers used, and other factors, but there are options for most budgets, from around $75 or so up to as much as you want to spend. I have made videos for two ways to forward face, one that is very similar to the stretchy wrap Pocket Wrap Cross Carry: Forward facing PWCC in a woven wrap, and the other that is sort of like using a ring sling: Robin’s hip carry modified for forward facing. For the PWCC, you can use your base size, and for the Robin’s you can use your base size – 2, (so a 4 if your base is a 6), and also can use a longer wrap easily too. PWCC is a narrow based carry, where your baby’s legs will hang down, but the Robin’s is a “Buddha” carry, where your baby will be sitting with their legs folded in a sort of pouch. Check out the videos for more clarity on that!

Forward Facing Pocket Wrap Cross Carry in a Woven Wrap


Robin's Hip Carry Modified for Forward Facing


Both of these carries require a bit more learning to get down well, but if you are planning to wrap as your baby grows, they are a great way to practice wrapping skills such as strand by strand tightening even if you have a baby that doesn’t want to face you. Wraps are also very adjustable, and versatile to grow with you and your child through your babywearing years.

Ring Sling: 
Ring slings are also available in a huge variety of fabrics, patterns, and colors. There is a variety in shoulder style, too – gathered and pleated are most common, but there are others including padded, which is what I use in my video. As with wraps, cost varies a lot, but you can usually find a good one in the $50-$100 range. They have less of a learning curve than wraps, and are also useful for a variety of ages from newborn to toddler. You’ll use them differently as your baby ages – 30lbs does not feel great on one shoulder for long, but toddlers often want up and down quickly and ring slings are great for that. For forward facing, you’ll again be making a sort of pouch, and putting your baby in on their bum with their legs crossed in front of them Buddha style. The video will clear that up a bit for you: 

Forward facing in a Ring Sling. 


Mei Tai:
There are a couple mei tais that allow forward facing. The CatBird Baby mei tai and Infantino Wrap and Tie are readily available mei tais that allow forward facing. They both come with built in ways to cinch the bottom of the body panel and make it narrower, which is what makes it more comfortable for your baby to sit facing forward. The Infantino is under $40 new, and relatively easy to learn to use, and the CatBird baby is under $100. Mei tais do take some practice to get adjusted well and tied tightly, but the learning curve is definitely shorter than for wrapping. It’s also a two shouldered carrier and carry, so some wearers may prefer that to one-shouldered options like ring slings. Mei Tais are also very adjustable for anyone to use. Most mei tais are not advertised as forward facing compatible, but the Wrap and Tie is, as is the CatBird Baby mei tai. Here’s a video:

Forward facing in a mei tai. 


SSCs: 
Soft Structured Carriers, or SSCs, come in a huge variety of designs. For the most part, the basic concept is the same – they are often called buckle carriers because they buckle around your waist and have shoulder straps that buckle together to hold it on. They are similar to a sturdy backpack, and are usually pretty quick to learn to use, and also quick to put on and off. They have probably the lowest learning curve of the group, but the tradeoff is that you have to find the design that is most comfortable for you. Each brand has a different amount of padding, differently shaped shoulder straps, different buckle placement, etc. Once you find what works for you and your baby though, they are very comfortable and convenient. They come at a variety of price points; there are budget options available around $50, many options at around $100-$150, and there are some that cost more depending on what you’re looking for.

Not all SSCs allow forward facing. I will briefly cover some of the more common ones, but there are some others out there.

Baby Bjorn has a few options. There is the original Bjorn carrier, the very similar Bjorn Active, and more recently the Bjorn One. Neither the Original or Active have waist bands, which can make them a bit less comfortable for the wearer as baby gets larger, but the One does have a waistband. They are all a little different than most SSCs in the design, and take a little time to get familiar with how they are used, but once you spend some time practicing they are easy to use.

Forward Facing in a Bjorn Original


Forward Facing in a Bjorn One


The Ergo360 is another forward facing SSC. They have a wider seat than most forward facing SSCs, and have done their best to keep baby in a more ergonomic position than most SSCs allow when facing forward. SSCs in general tend to have a narrow base for forward facing, but Ergo has more of an actual “seat” for baby in the 360. There is just a quick adjustment with buttons to change from inward to outward facing.

Forward Fcaing in an Ergo 360


Lillebaby allows forward facing in their standard size carriers, there are flaps that detach from the waistband and make the base narrow to allow for newborn wearing and for forward facing.

Forward Facing in a Lillebaby


The Beco Gemini also allows forward facing or newborn wearing with a quick adjustment at the panel base. They have flaps that unsnap and re-snap into a narrower position.

Forward Facing in a Beco Gemini


This list is not exhaustive, mainly for SSCs, but it does cover the variety of options available for forward facing.

However you choose to carry your baby, there are a few things I like to keep in mind beyond the basic safety. You know your baby best, and babies (and kids) tend to let you know if they’re unhappy. If your baby wants to face forward, they will let you know. And if they like the carrier you’ve chosen, you will be able to tell. It might take a little trial and error, but the feeling of holding your baby close paired with the freedom to move around and experience the world together is worth every second.

My husband, Eric and his little helper Graham


This amazing blog post was written by educator Kate Krengel as her project toward her advancement into Advanced Babywearing Educator (ABE) Status.  Thank you Kate for your knowledge and insight! Our chapter is lucky to have you. 

Tuesday, March 15, 2016

Tutorial: Footie's That Fit


I love footie pajamas- they have the promise of warm cozy fuzzies… They are cute, soft and are an outfit all in one! What’s not to love?
The only problem I have is I can’t find the perfect size. If they fit well in the leg, my baby can romp around the house fine- but when she wants uppies, they ride up, making it uncomfortable for her and sometimes triggering the step reflex which causes her to pop her seat.
Luckily, there is a solution! All you need is big footies, scissors, elastic, a sewing machine and 15 minutes. (You could hand sew as well, but I think a machine would be the best option!)
In a nut shell, we are going to cut the big foot down on the footies, and then add elastic to pull up any extra fabric, making it easier for Baby to be mobile!
For reference, I used a 24 month size for my 13 month old, who is 30 inches, 21lbs and leggy.
First: Cut the foot of the footies down to size. Use a pair of fitting jammies as a template, mark on the footies the correct size. Zig zag stitch once or twice right over your mark, then cut right along the stitches, leaving no seam allowance.


Second: Add the elastic in the legs to cinch up any loose fabric when Baby is not being worn.
Cut two pieces of elastic, about 6 inches each. In the leg that has no zipper, try to get it down as far as you can and anchor that end of the elastic with a pin, about 2 inches from the side seam. (if you really like to sew, you could use a seam ripper and open this leg, then sew it shut again once the elastic is in place). On the leg with the zipper, match how far down the elastic goes, and pin.


Sew the elastic along each leg, pulling it tight as you go, using a straight stitch.


NOTE:  Having done multiple of these now, I will say the more leg you have to cinch up, the farther down and more elastic you would  use. For example, for the biggest pair of footies my daughter had, I went about 3 inches from the heel and used 7 inches of elastic. In the picture below, I went about 8 inches from the heel and used 5 inches of elastic.


And that's it! Perfectly fitting footie jammies for babywearing!


This fantastic tutorial was written by Volunteer Toria Marquard-Schultz.  Thank you Toria for sharing your crafty ways! Now off to do some sewing...